Late last night, I put the final stitches into "My Beloved's" by Country Cottage Needleworks. I was able to complete this project in just two weeks, which you will know if you are a regular reader, is quite an accomplishment for me.
(I apologize for the hoop marks in the pictures; I generally don't press my finished pieces until I am ready to frame or otherwise finish them.)
I think if I were to stitch this design again, I would choose a color other than the green (Crescent Colors' Dandelion Stem) for the words; if it were a gift, I'd try to learn what color would match the recipient's decor.
This was a great project to stitch, and I thoroughly enjoyed it.
What a beautiful day we enjoyed today! Sunshine, warm temps. Cassie sat in some of the windows, intent upon the scenery outside. Unfortunately, I spent my afternoon entering receipts into Quicken, something I haven't done in months.
Contrary to what the content of this blog might lead you to believe, I do still love cross stitch. I don't have a picture yet, but I finished the wedding sampler for Grace & Anthony. I need to take it to Joann's or Michael's and choose a frame. I also came across our 25th anniversary sampler; I'll take that to the store, too.
Meanwhile, I started a new project! I began last Thursday, the day I got the injection in my knee, and have worked on it every day since. I guess that's one nice thing about being laid up. I chose Country Cottage Needleworks' My Beloved's. It is stitching up quickly. Please excuse the poor picture; I propped the piece up on my computer to take it.
I made Mother's Day cards for my mom, and my mother-in-law. They are identical, except for the background paper.
Card recipes:
Paper: 1st card - from the "Lemon Flower" stack by DCWV
2nd card - from the "Linen Closet" stack by DCWV
Ribbon: Dollar Store
Stamp: Anita's
Nestabilities: Classic Ovals Small and Large
Silver Embossing Powder
Things have continued to be difficult around our home, although we are hopeful things are looking up. My husband had a bad reaction to the new chemo drug, which caused terrible pain and suffering. (The condition is called Hand-Foot Syndrome, but Phil developed it under his arms from the crutches, on his hands, a small patch on his stomach, and one other place. It looked like a horrible sunburn, which is now peeling. You can see a picture of what his hands now look like on Wikipedia.) Thankfully, he is on the mend, although the oncologist says it will be another two or three weeks before he is completely healed. Needless to say, he will not be receiving any more of the drug. And he's still wearing the immobilizing boot for his foot problem and must continue to stay off his feet as much as possible.
This weekend, I am also off my feet, following my (I think) fourth Synvisc injection in my knee, so I thought I should try to catch up on blog posts. First up is a birthday card I made for my mom, whose birthday was at the beginning of April.
I used another Stamp TV technique called Watercolor Spritz. I will embed the video at the end of this post. I chose to use watercolor paper, even though in the video it says you don't have to, since I didn't have any heavy white cardstock. Here's my card recipe:
Stamp: Vintage Labels by Stampin' Up!
Ink: Memento Bamboo Leaves, Impress dye ink in Wisteria
Markers: Impress markers in #7 - Pansy & #12 - Spring Green
Nestabilities: Labels 4 & 8, Fancy Tags
You guessed it - I have yet another card to share with you! I love how this card came out, and more importantly, the recipient - my son-in-law's mother - appreciated that it was handmade.
To create the purple background paper, I tried a new technique - Letterpress with Impressabilities - using the Spellbinders Flourish Impressabilities, which I inked with Wisteria by Impress and then ran through my Cuttlebug. It took me two tries to get an even impression, I think because of the poorer quality of the cardstock I chose. Using the same ink, I stamped Happy Birthday by Stampin' Up!, then cut it out using Nestabilities Labels 5. I created the bow with my Bow Easy and affixed it to my diagonally-placed yellow ribbon with a glue dot.
Here is the video from Stamp TV which shows how to do the letterpress technique.
It's been a month since I last shared any projects with you! Between my husband starting on a new chemo drug after the last one stopped working after just over two years, and then being diagnosed with sinus tarsitis (that's NOT tartar sauce in the sinuses!), for which the doctor has immobilized his foot and ordered him to stay off it at least until April 26, things have been difficult around our home. I don't think any of us realized how many chores Phil did until we had to split them up among us. There have been pictures on my hard drive since March 24, waiting to be tweaked and uploaded, but I just haven't had the energy to do anything with them until tonight, although I dealt with only a few of them.
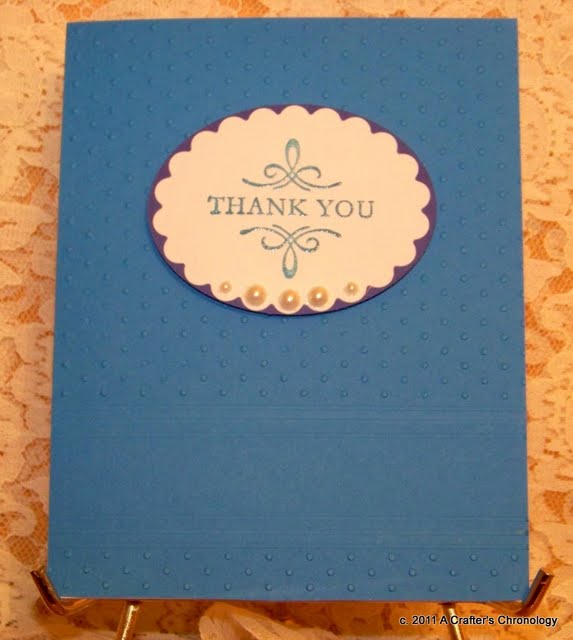
First up is a thank you card in my favorite shade of blue.
First, I ran a piece of blue cardstock through the Cuttlebug using the Swiss Dots embossing folder. You'll notice that I left a blank space; to achieve this, I put the paper in the embossing folder sideways and embossed the top part, then I repeated that process for the bottom section. I then used my Martha Stewart Scoring Board to score three lines above and below the embossed area. You can see that more clearly in the second photo. I stamped Stampin' Up's Elegant Thank You with Versacolor Mountain Lake and heat embossed it using clear embossing powder. I cut it out using Nestabilities Classic Scalloped Ovals Large and layered it on another oval cut with Nestabilities Classic Ovals Small. Finally, I added some pearls along the bottom of the scalloped oval.
To learn how to do this technique, you can watch Stamp TV's video.